 I knew right off that the white linoleum in the kitchen, sunroom, and laundry room would have to go. We’ve owned a home with a white kitchen floor before, and I knew from experience that we’d be mopping daily if we left the white linoleum! So I started researching our options. I didn’t want to lay ceramic tile down, but I really love the look of tile, so I checked into peel-and-stick vinyl floor tiles. I found tons of designs on eBay at incredible prices, but I found once shipping was added back in, the price came out to over $1.50 per square foot, which was higher than Lowe’s price of 88 cents per tile. I still thought 88 cents was a bit high for vinyl tile (almost the same as ceramic tile in the same size), so I kept looking. We have a flooring “liquidator” place nearby, but their prices were higher than Lowe’s also! No luck there. So I just figured I’d wait. There was no rush, since I wanted to finish painting before laying down any flooring. I finished up trim paint in the living room and put two more coats of primer on the sunroom (a wonderful helper had already done the first coat). This room, while small, proved a bit of work to prime, as it had narrow, flat trim below the ceiling (and we didn’t want to hit the ceiling, which didn’t need repainting). With crown moulding, it is much easier to miss the ceiling and hit only the moulding. This room also has sliding doors with retractable blinds that couldn’t be removed easily. That meant painting carefully with a brush behind the blinds:

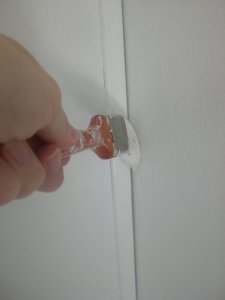
Finally, the batten strips in this room seem to stick out a bit more than those in other rooms, and the roller couldn’t easily get paint right up next to them, so I had to cut in all that paint by hand:
 When I ran out of primer and had to stop back at Lowe’s for more, I was very excited to find the Cryntel vinyl tile I liked was 50% off! That meant each tile came in at 44 cents–just as good as the eBay prices but without the shipping! This is the “Sandstone” color, which is similar to ceramic tile I’ve loved in our old house. It’s the color of dirt, so dirt won’t show easily! 😉 I went ahead and purchased enough tile to cover the kitchen, sunroom, laundry room, and large laundry room closet. I needed just under 350 square feet to do everything. As always, you’re supposed to add 8% for waste, so I decided to purchase 375 square feet of the tile. Lowe’s had just that in stock with one box left over! I was so glad I’d just “happened” to be in the store that day and had thought to check in the flooring section. While there, I also grabbed some ceramic tile to test out on the laminate countertops for a future project. The flooring tile sat around for over a month and a half before I got to it, since life got busy and I had no time for the trailer during the last half of March and most of April.
After finishing the kitchen cabinet re-do, I went ahead and de-waxed the linoleum floors as directed, using two parts ammonia to one part water. After letting this dry and air out thoroughly, I thought I’d just put down a couple of the peel-and-stick tiles to see how they looked. My helper from church and I measured to find the center of the kitchen. Normally, you’d mark the center by snapping a chalk line, but the white linoleum was already in a one-foot-square grid pattern, so we measured and found that the exact center of the room was only one and a half inches off in the grid. It would be a piece of cake to use the grid to lay the tiles perfectly square, so we opted to do that instead of starting at the exact center. I’d thought we’d just put down a few tiles to “see how it’s going to look,” but, before we knew it, we’d tiled half the kitchen!

This really was a cinch. The tiles have paper backing that you simply peel away to reveal the sticky adhesive beneath. You press the tile firmly to the floor, laying an “L” shaped pattern to begin with and filling that in to keep things nice and square. Once the tile is in the right place against its neighboring tiles, you firmly roll it flat to the floor with a rolling pin (I used my old faithful retired after years of service in bread making!). Here you can see my helper rolling a tile:

This job is actually so easy that my children later got in on the act. Here’s my daughter helping Mommy “rolling pin the floor” (as she said!).

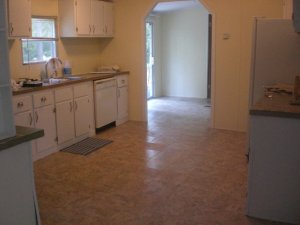
We continued working for a total of fifty-five minutes and had the entire kitchen finished except for the edge pieces abutting the cabinets, floor vent, and carpet (those would have to be cut by hand, and I didn’t have a utility knife with me that day):


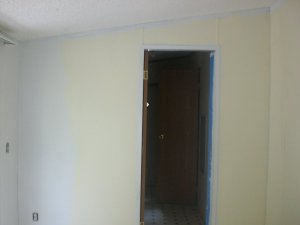
What a thrill! The kitchen really would be more user-friendly with its new floor, and I couldn’t wait to see it fully come together. But that would have to wait a few days until I could get my hands on a utility knife and scissors. At left is a shot taken closer to the dishwasher that shows the floor more clearly. You can see that I’d only need small rectangles of tile near the cabinets to finish up there (slightly larger ones to go beneath the dishwasher and stove). Going around the vents and the carpet curve at the living room would take a bit more doing. In the meantime, I still needed to finish painting the sunroom, since I didn’t want any of my buttercream paint dripping on a new floor! After the initial two coats of primer (long since dried), the color paint went on very nicely, as you can see here:
Four days later, my two oldest sons and I laid the rest of the full tiles in the sunroom and laundry room. Because those rooms are much smaller, they were done in a wink. Then it was time to get to work custom-cutting tile to fit around the cabinets, door jambs, and vents. I’d read in one how-to online that it would help to make a cardboard pattern to fill in the smaller spaces. So I cut my first pattern to fit next to the cabinets on the far right wall next to the fridge:

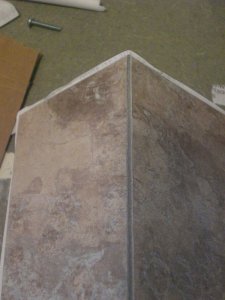
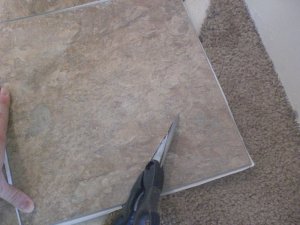
Next, I took the pattern and laid it out on a whole piece of tile, then scored firmly along the side of the pattern with my utility knife (in the second picture you can see the score line):

After scoring three times, the piece easily broke along the score line:
All I had to do then was flip the tile over and cut through the paper backing to get the tile to come apart cleanly:

Now I was ready to place the tile and roll it to stick:

Going around some cabinets was a bit tricky, and I actually found it easier to use scissors instead of the utility knife:
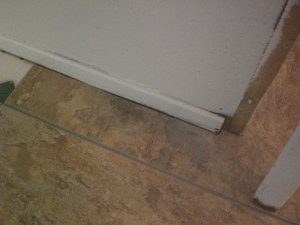
The curve of carpet that separates kitchen and living room was another challenge, but I found the utility scissors worked nicely. I did end up with blisters on my thumb and one finger after cutting tiles that day–ouch! But it really was worth it to see the final results, as these pictures will demonstrate:


My oldest son and I placed the last few cut tiles in the sunroom and utility room to finish, then stepped back to admire our handiwork:

This was well worth the grand total of six hours (including breaks for lunch!) that it took to get our new floor down. We are absolutely tickled pink with the results. And the final cost, including the ammonia I purchased to clean the floor? $167.44. Another bargain basement do-it-yourself project!
Next time I’ll show the results of the living room paint job and share some decorating photos that have inspired me. See you then!


 Amanda Livenwell is the pen name of a stay-at-home mom who shares the adventure of living large on one income in, yes, a double-wide trailer! Join our family as we say goodbye to suburbia, trim down, and start saving to build our own home. We're going to talk about doing it yourself, living beautifully on less, making do or doing without, and counting it all joy in the process. We'll cover prep-work and painting, refacing kitchen cabinets, flooring on the cheap, tiling over laminate, upholstering furniture, and just rolling up our sleeves in general. If you love home improvement, this is the place for you. Let's get cracking!


